
Now You See Me - installing an invisible zip
- reynaldorobinson
- Dec 19, 2025
- 5 min read
Invisible zips have a reputation for being a little intimidating — but once you know the right steps, they’re one of the quickest ways to give your wedding dress a clean, professional finish.

It's important to remember that a special zipper foot is used to install a concealed/invisible zip. The foot is designed with grooves that hold the coil/chain of the zipper upright and out of the way so that the needle can stitch closely alongside coil/chain. It's important to make sure that the zipper foot is made to accommodate the zip/brand of zip which you buy. It's also important to note that invisible zipper feet for metal and coil zips are not always interchangeable.
In this guide, we’ll walk you through everything you need to know paying particular attention to mastering the stitching technique that keeps the zip truly “invisible". At VJ Seamsters, we’re all about helping makers create beautifully crafted garments with confidence, and this tutorial is designed to take the mystery (and the stress!) out of the process.
Let’s get your zips looking flawless — every time.
Step 1. Press Synthetic Coil from Wrong Side of Zip

Press synthetic coil from wrong side of zip on a cool iron setting - you don't want anything to melt. Make sure zip is open so that tapes are smooth and coils stand away from tapes. This will ensure that zip will feed smoothly through grooves in zipper foot. Do not close zip until both left and right tapes have been stitched into place.
Step 2. Stitching Right Side Tape

Finish garment edges along centre back if needed: with zig-zag, overlock or pinking shears. Position open zip, face down onto right side of garment - coil running along Centre Back (CB) seam-line and Top Stop at appropriate mark: 10 mm from seam-line of neck edge. Pin then tack into place. Fit right-hand groove of foot over coil. Leaving threads long at Top Stop, stitch down to tab/pull. When reached - back stitch to secure. With sewing needle, thread long top thread at Top Stop of zip and stitch through to wrong side of dress - do not pull too tightly in order to avoid zip puckering or rippling, then knot.
Step 3. Stitching Left Side Tape

Pin (and if preferred) tack unstitched tape, face down, onto right side of opposite side of garment. Zip Tape should be within garment seam allowance - facing towards raw edge of Centre Back (CB). Position Top Stop at appropriate mark. Ensure that the coil of zip is running along seam line of CB. Pin and tack zip into place if preferred. Fit left-hand groove of invisible zip foot onto coil of zip. Carry out stitching procedure as in Step 1.
Step 4. Closing Zip

Close zip. Attach regular zipper foot and position to left of needle. Pin and tack/baste CB seam below zip. Leave threads long then lower needle into fabric at end of stitching - slightly above and to left of the last stitch of stitching line. Stitch seam down towards hem. Using hand needle, at base of zip, stitch top thread through to opposite side of garment and knot with under thread - remembering not to knot too tightly - you don't want any ripples or puckering.
Step 5. Holding Zip Ends Down

To reduce the possibility of bulking through CB seam due to zip ends being loose and not lying flat - hold zip ends down (pin if preferred) - stitch each tape end to a seam allowance ONLY: not the garment.
Step 6. Keeping Coils Held Upright

Open zip. If preferred, pin tops of tape into position - stitch across tops of tapes with the coil held upright as shown above.
Further Tips & Tricks: Invisible Zip Installation
(i) Tack Centre Back (CB) Guideline

You can hand or machine tack a CB guideline on both left and right back pieces. It will help in accurately positioning zip onto the centre back seam. Therefore, place zip's coil exactly on this tacked line, and use it for matching the seam lines below zip.
(ii) Tack Zip in Place

This really is my top tip - I'm constantly hand tacking zips into place before the real stitching begins! It is particularly helpful when installing an invisible zip with a regular zipper foot. I usually pin, tack then stitch one tape at a time, working from top of zip to bottom.
(iii) Using a Regular Zipper (generally for metal teeth)

Pin and tack first tape into place, with foot to left of needle, stitch close to teeth. Adjust foot to right of needle and repeat for other side. Finish as in Steps 3, 4 and 5.
(iv) When You Have a Dress Placket

Install zip following Steps 1 to 5. Close Centre Back Seam below zip. Then above Top Stopper, whipstitch left and right tapes together or add straight eye fastener or hook and eye. See Mastering Centre Back Zips: Tips and Tricks for a Flawless Wedding Dress Finish - Section D.
(v) Reducing Puckering

For fabrics which have a tendency to pucker such as softer pliable and some sheer fabrics keep fabric and zipper taut by holding them as they pass under needle. Let feed dog move the fabric - do not pull it - this should reduce the possibility of puckering.
(vi) Shortening Zip
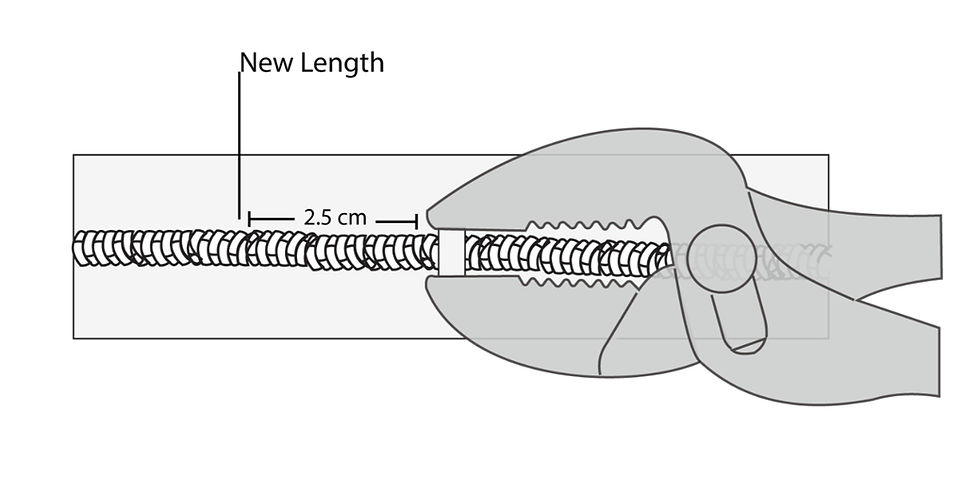
Measure and mark new zip length on tape. At about 2.5 cm down from mark, whip stitch over zip's teeth. If possible, using pliers, adjust bottom stop position, clamping it into its new position. Cut off zip 10 mm below newly positioned bottom stop. Install zip as per instructions Steps 1 to 5.
(vii) Adjusting for Different Fabrics

The needle may have to be adjusted from centre to slightly left and slightly right of the needle hole to accommodate weight of fabrics. As such, for average weight fabric, the needle generally should stay in the centre of the hole. For lighter weight fabrics the needle can be positioned slightly to the right (above left) - so that stitching is closer to the coil of zip. For heavier weight fabrics the needle will be positioned slightly to the left (above right) of the hole: slightly farther away from zip coil.


Comments